
UVic Wi-Fi
UVic’s secure, high-speed wireless network provides Internet access for UVic students and employees on campus.
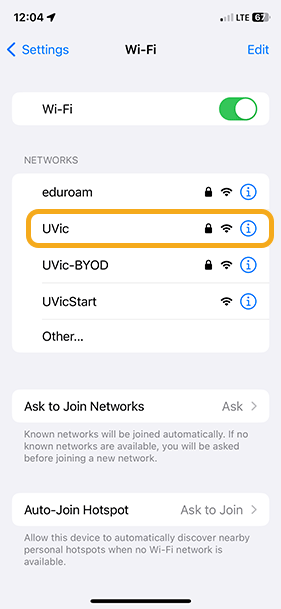
There are 3 other wireless networks: eduroam, UVicStart guest Wi-Fi and UVic-BYOD for home electronics in residence and cluster housing.
Details
The UVic wireless network is the secure network we provide for students and employees (including affiliates and emeriti). Most laptops, smartphones and tablets are compatible.
- Type
- Wireless network
- For
- Students & employees
- Cost
- Free
Connect to UVic Wi-Fi
Follow these instructions to connect to UVic Wi-Fi:
- Select the network icon in the taskbar.

-
Select the UVic network.
-
Select the Connect automatically checkbox, then select Connect.
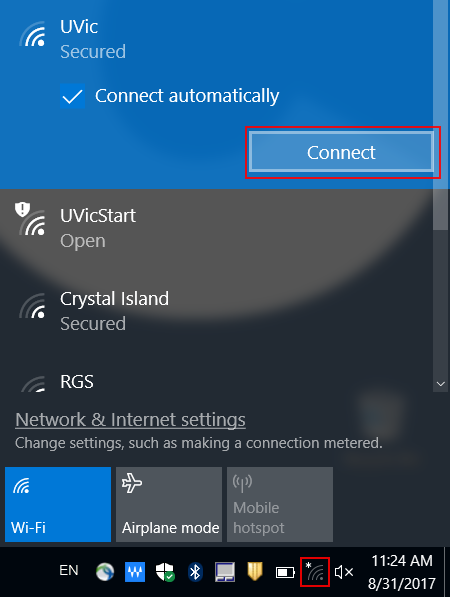
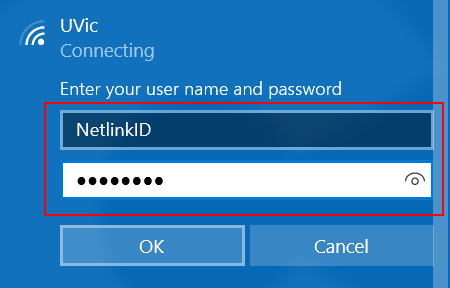
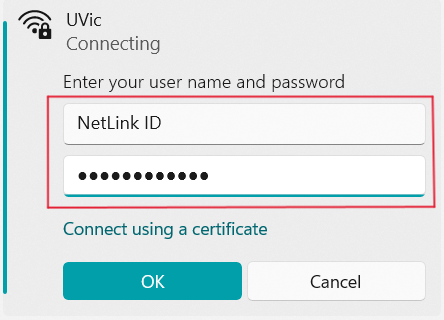
- When prompted, enter your NetLink ID and passphrase, then select OK. User the same name you'd sign in to Brightspace or the UVic website with. Don't add "@uvic.ca" to the end.
- If you're asked whether to continue connecting, select Connect. The full message you might see is:
"Continue connecting?
If you expect to find UVic in this location, go ahead and connect. Otherwise, it may be a different network with the same name.
Show certificate details"
It typically takes 10-15 seconds to connect. When it's done, the UVic network status will labelled "Connected, secured".
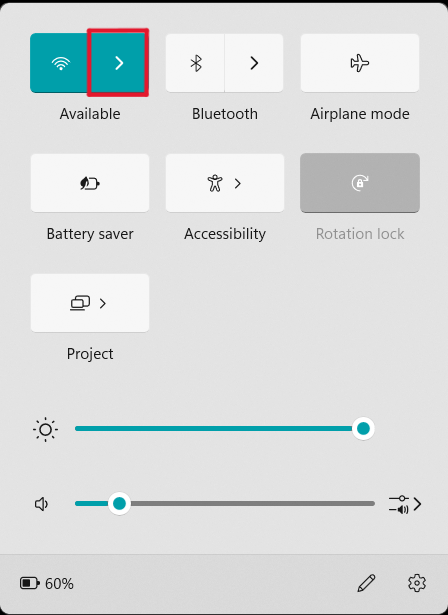
- Select the Network, Sound, or Battery icons (
 ) on the taskbar to open Quick Settings.
 - Select the › button next to (Manage WiFi connections).
- Choose the UVic network.
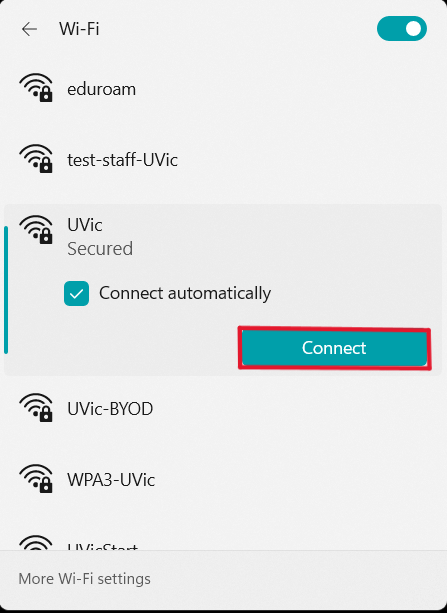
- Select the Connect automatically checkbox, then select Connect.
- When prompted, enter your NetLink ID and passphrase, then select OK. Use the same name you'd sign in to Brightspace or the UVic website with. Don't add "@uvic.ca" to the end. Select OK.
- If you're asked whether to continue connecting, select Connect. The full message you might see is:
"Continue connecting?
If you expect to find UVic in this location, go ahead and connect. Otherwise, it may be a different network with the same name.
Show certificate details"
It typically takes 10-15 seconds to connect. When it's done, the UVic network status will labelled "Connected, secured".
- Select the Wi-Fi icon () in the menu bar and select the UVic network from the drop-down menu.
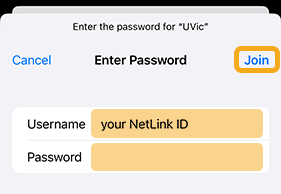
- When prompted, enter your NetLink ID and passphrase, then select Join. Use the same name you'd sign in to Brightspace or the UVic website with. Don't add "@uvic.ca" to the end.
- Select the “Remember this network” checkbox, then select Continue.
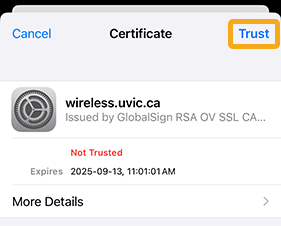
- If you’re prompted to verify a certificate, select Continue.
- When the Wi-Fi icon turns solid black or white, it’s finished connecting. This may take a few seconds.
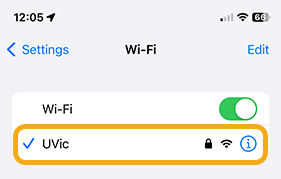
- From your home screen, open the Settings app.
- Select Wi-Fi, then choose the UVic network.
- When prompted, enter your NetLink ID and passphrase, then select Join. Use the same name you'd sign in to Brightspace or the UVic website with. Don't add "@uvic.ca" to the end.
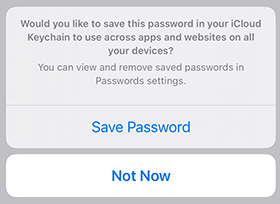
- You may be asked whether you want to save the password to your iCloud Keychain. Choose whatever you prefer: it'll work either way.
- If you’re asked to trust a certificate, select Trust to continue.
- When the Wi-Fi icon appears in your status bar and a checkmark () appears, it’s finished connecting. This may take a few seconds.
In Android and some other operating systems, you’ll need to manually enter some network settings. The information you need to enter will vary depending on your device brand, model and configuration. It will usually include some combination of these:
Network/SSID: UVic
Network security method or Network authentication method: WPA2-Enterprise, WPA2-PEAP, or WPA2-RADIUS
EAP or EAP method: Protected EAP or PEAP
PEAP version: Auto or PEAP
MTU: Automatic
Phase 2 authentication or Inner authentication: MSCHAPV2
CA certificate: Use system certificates or leave blank
Domain: uvic.ca
Identity or Username: [your NetLink ID]
Password: [your NetLink ID passphrase]
You may need to open a ‘more info’ or ‘wireless security’ area to find some settings.
To use the UVic Wi-Fi network, you’ll need a device that supports WPA2-Enterprise security.
Devices that will generally work include:
- modern Windows and Chromebook laptops
- modern Mac laptops and desktop computers
- modern iPhones and iPads
- modern Android smart phones and tablets
Devices that will not work include:
- home entertainment devices like game consoles and smart TVs
- network-connected peripherals like storage and printers
- smart home devices and controllers
Students who live in residences or cluster housing can connect game consoles, smart TVs and streaming boxes using UVic-BYOD wireless network.
Access for conference & event guests
If you’re organizing a conference or other event at UVic and want to provide secure Wi-Fi access to your attendees, we can create a group Wi-Fi account for them.
- For
- Event organizers
- Cost
- $200 (one-time setup fee)
We only take payment for services by internal budget (FAST) transfer so work must be initiated or sponsored by a budget administrator. If you're not sure how to start a request, ask your supervisor, department admin, faculty sponsor or PI.
We need at least 5 business days of advance notice to create a group account. Guests who use the UVic Wi-Fi network are subject to the same policies as UVic students and employees.
Other Wi-Fi networks
UVicStart Wi-Fi for guests
UVicStart is a free Wi-Fi service for visitors. If you’re visiting the UVic campus and can’t use the UVic network, eduroam or a group Wi-Fi account, you can use UVicStart.
Coverage
Wi-Fi is available in nearly every building on campus including residence buildings and cluster housing. It extends to some outdoor areas near buildings. The coverage area for all the wireless networks is the same.
Get help now
Contact IT support to:
- get help connecting to UVic Wi-Fi
- report an outage or issue