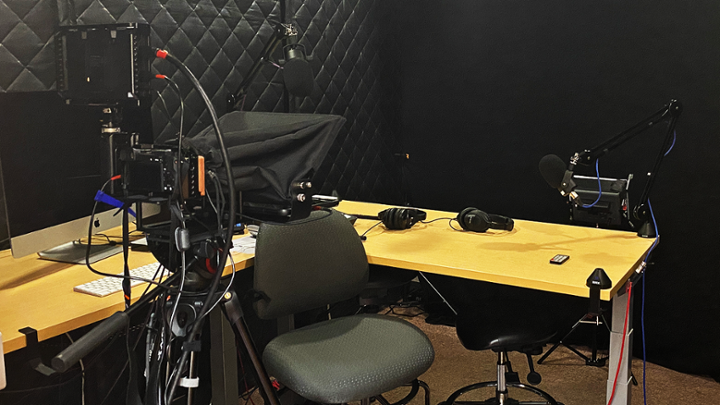
HSD A154 – Video room

Lab details

  • Room type: Media studio
  • System type: Mac OS
  • Mon-Fri: 8:30am-4pm
  • Sat-Sun: Closed
  • Holidays: Closed
  • Capacity: 1-3
  • Availability:

HSD A154 is a bookable space designed for recording, editing and livestreaming video. It's partially soundproofed and has high-quality digital recording equipment. You could use it to:

  • record a vlog or presentation
  • host or deliver a webinar
  • record an instructional video and voiceover

We don't support 'bring your own device' in HSD A154. Use the iMac in the room for recording.

Room capacity: The room has 1 computer and is set up for 1 person to record. Seating and space is available for 3.

Location

Accessibility information

This room is located on the basement level with elevator access from the HSD building lobby. The elevator gives you access to the door on the far side of the drop-in lab.

What's in this room

HSD A154 has:

  • partial soundproofing
  • 27" iMac
  • 16" Wacom Cintiq creative display
  • Blue Yeti microphone
  • Sony a6400 mirrorless camera (connected with a Cam Link 4K)
  • Teleprompter
  • 3 LED video lights
  • Black video backdrop

Software

The software installed in this lab can change throughout the semester.

  • Adobe Creative Suite: Photoshop, Premiere Rush, Premiere Pro, Audition, Illustrator, After Effects, and others
  • Apple free creativity apps: Garageband, iMovie, Freeform
  • Apple Pro apps: Logic Pro, Mainstage, Final Cut Pro, Motion
  • Other software
    • Video meetings: Zoom, Microsoft Teams
    • Video recording & editing: Camtasia, DaVinci Resolve, Echo360
    • Livestream & broadcasting: OBS, NDI Utilities
    • Sound: Audacity
    • Graphics & illustration: Krita, Storyboarder, Blender, GIMP

Not sure what to use? We recommend:

  • Echo360 is fairly easy to use. It lets you record a video and screen recording at the same time, and upload them directory to your course in Brightspace. Its editing tools are very rudimentary, not suitable for polished, professional-looking and -sounding work.
  • Camtasia can also record video and screen at the same time and has much more advanced editing features. It's focused on screen recordings, so it's great for recording things like PowerPoint presentations and software demos.
  • iMovie can record video (but not screen recordings) and has good, easy-to-use editing tools.
  • Premiere Rush has a slightly steeper learning curve than iMovie but has more features for creating videos for social media. You need to create a UVic Adobe account with UVic Online Services to use Premiere Rush.

Booking

  • You must be a current UVic student, instructor, or staff member to book this space
  • Bookings for this space are managed through Microsoft Bookings
  • Only covered drinks are permitted; please no other food or drinks

See our student booking page for booking instructions and full service guidelines.

Users guide

 Before you start

  • Reserve this space to use it. If you don’t have a reservation, talk to the help desk staff at the counter. We can check if it’s available and book it for you if it is.
  • There are often exams in the classrooms next to HSD A154. Be mindful of how loud you talk.
  • Please no food or drinks except for beverages in sealed containers. Please be careful. Audio gear is very sensitive to water damage.
  • Save your data: Data saved on the Mac mini is automatically deleted. Always back up your work. You can use OneDrive, UVic network drives or another cloud storage service, or you can bring your own USB or Thunderbolt storage device. 
  • If you want to use Adobe Creative Cloud software, you need a UVic Adobe ID. You can sign up at UVic Online services for free.

Device settings

Set the computer (or whatever app you're using) to use:

  • Camera: 'Cam Link 4K'
    • you can use the camera in any app where you can use a webcam
  • Microphone or sound input or recording device: 'Blue Yeti'
  • Speaker or sound output or playback device:
    • 'Blue Yeti' (for the headphones we provide) or
    • 'Built-in speakers'

You can connect your own USB headset and select it if you prefer.

Mic

  • The side of the mic with the Blue logo, mute button, and headphone volume dial should be facing you. If it's not, rotate the mic towards you.
  • For the best sound, the mic should be around 15 to 30 cm (6-12 in) from your mouth. It'll still work from further away.
  • The light in the mute button shows the status of the mic:
    • blinking red: muted
    • solid red: not muted
    • off: mic isn't connected

More tips and resources

Some ways you can use the stylus with no additional setup:

  • as a mouse cursor on the pen display
    • tap the screen to click
    • double tap to double click
  • to draw or paint in graphics apps (like Photoshop, Illustrator, Krita and Storyboarder)
  • to draw in whiteboard and collaboration apps (like Apple Freeform and Microsoft Whiteboard)
  • to mark up PowerPoint slides while you present

There's a small lever at the top of the stand (on the back of the display). Pull it up to adjust the angle. You can see an illustration of  how to adjust the display stand on Wacom's site.

You can customize the stylus buttons and create shortcuts with the Wacom Center app. Go to Wacom's support guide to learn how.

Displays

The iMac uses 3 displays: the built-in 5K display, the Wacom pen display, and the teleprompter display. Depending on how you want to use them, you may need to change the display settings. To open display settings:

  1. Go to the Control Center menu (Control Center icon).
  2. Select   Screen Mirroring.
  3. Select Display Settings...

The Displays tab in System Settings will open. 

We usually recommend having the teleprompter mirror the built-in display and using the pen display as an extended display. To do this, use these settings:

  • Built-in display
    • Use as: Main display
    • Resolution/scale: Select Larger text to make it easier to read from the teleprompter. Otherwise, pick whatever you prefer.
  • Field monitor (the teleprompter)
    • Use as: Mirror for Built-in Display
    • Optimize for: HSDA154-01
  • Cintiq 16 (the Wacom pen display)
    • Use as: Extended display
    • Resolution/scale: 1080p (Default)

Typically, the pattern dial should be set to the heart-shaped symbol. The gain dial should be around the middle of its range. Since the mic is hanging upside down, the mark on the dial should be pointing down.
Yeti mic, upside down. The front has a headphone volume dial on top and a mute button below it. The back has a pattern dial on top and a mic gain volume below it.

If the light on the mute button is off, the mic isn't connected to the computer. Try unplugging the USB cable from the mic and the computer and reconnecting it.

  • Make sure power to the lights and camera are on. The switch is on the right-hand side of the desk.
  • Look for the Cam Link 4K on the desk. It looks like a large USB thumb drive with a white light on the side. It's connected to a USB extension cable on one end and an HDMI cable on the other. If the light is off, disconnect it from the USB extension cable, wait 5 seconds, and reconnect it.

Get help now

If you’re having problems with lab equipment, software, or the space, please see a staff member at the HSD A140 support desk.

You can also contact us for help with any questions about UVic technology, services, or accounts.