
UVic events calendar
The UVic events calendar allows units across campus to create and manage public events. By default, events added to your unit calendar will also appear in the main UVic events listing.
UVic uses a platform called LiveWhale to manage the events calendar.
Logging in and getting started
Privacy training
The events calendar will soon collecting RSVPs for your events. Because this may include personal information (such as name and contact info), you will need to verify you have completed UVic's mandatory privacy training for new employees. This training explains your legal responsibilities when handling others' personal information.
Requesting access
You can request access to your department or unit calendar by sending an email to the Senior Web Officer and CC'ing your supervisor.
Include in your email:
- your NetLink ID
- your preferred email address (either role-based or personal)
- a copy of your completion certificate from the New Employee Privacy Orientation
Log into LiveWhale
- Go to events.uvic.ca/livewhale
- If not already signed in, use your Netlink ID and password when prompted
- Bookmark the dashboard page to make it easier to find in the future
Toolbox/dashboard overview

In the upper right hand corner, you’ll see a “Toolbox” drop down. Click on that to see all the functions available to you through LiveWhale. Most of these options are also displayed in the top navigation menu. Most users will see:
- Your events (takes you to a list of the events posted from your group)
- RSVPs (this feature will be rolling out in 2024)
- Images (takes you to your image library)
- Files (takes you to your file library)
- Tags (takes you to a list of tags you’ve used in creating your past events)
- You can add a new tag here by pressing the "Add a new tag" button in the top right.
- Locations (takes you to a list of pre-configured campus locations)
- You can add a new location here by pressing the "Add a new location" button in the top right.
Add an event

From anywhere on the LiveWhale site, press the yellow “+ New” button in the top right.
Fill in the event details:
Title
Enter the event’s title in the “Enter a title for this event” space.
Add/change images
Tap the “Add/change images” square [+] to add a photo to your event, or simply drag an image from your computer onto that square. Make sure your images are sized to the correct dimensions.
Date
Date is a required field, of course; time is optional. (Check “All Day” for events that are in fact all-day events.) You may set an ending date and/or time by tapping the appropriate checkbox. There are repeating options for daily, weekly, monthly and yearly events, with a range of options for getting more specific.
Summary
Add a short summary of your event.
Event location
Set the event location. Pick from a list of pre-set locations on campus by clicking the “Show all locations” button or type in a custom location and check the “Add new location?” box.
You can also choose a campus building from the pre-set locations list and then add a room number to the field. For example, you can select "Administrative Services Building" and then type "room 123" or "B123" next to it in the field.
Mark as live or hidden
Events may be posted as Live or Hidden. Hidden events are never shown on public calendars, and are useful for events you’re working on but aren’t ready to promote yet.
Event type
Select the event types that are appropriate for your event. This list is the same for all calendar users.
If you want your event to show up on the Students homepage, be sure to check “Student life” under the list of topics.
Online event settings
If your event will be held online or in a hybrid model (in-person and online), check the “This is an online event” box. Add a link to join or register for the event under “Event web address” and then customize the text that will appear on the button that directs to that site under “Join Event button text.” If there are any instructions for joining or registering for the event (e.g. that folks need to be signed in with SSO to join) you can include those under “Special instructions.”
Event description
Enter an event description of any length. A number of text formatting tools are available, and you can add images and video to the event description as well.
Related content
Related content is a great way to give an event more context. You can link to a web page (e.g. the resume or portfolio page of a featured speaker) or to one of your other events. You may also attach files.
Contact information
Contact information is optional but definitely useful for people wanting more information about your events. If you always use the same contact info on your events, default contact info can be stored in your group settings. Contact the web team for assistance setting that up.
Event cost
Select an event cost option from the menu and input a price if applicable.
Save your event
Press “Save” or “Save and go to event.” This will publish your event to your group’s calendar.

Tags
Tags are descriptive keywords that help categorize your event. Tags are often used with event widgets — to create a list for a specific subset of events — so you should think of tags as an additional organizing tool for your calendar.
Tags can be custom your calendar group or can be global to all calendars in LiveWhale. Learn about using global tags with your events.

Delete, cancel or archive an event

- From anywhere on the LiveWhale site, click on “Your Events” in the top navigation menu
- Find the event you wish to delete, cancel or archive from the list. If you can’t find it, you can try using the search function on the right.
- Check the box to the left of the listed event.
- Click the dropdown at the top of the list that says “With checked items…”
- Select either “Delete,” “Cancelled” or “Move to archive," and then press "Go" to complete the action. Deleting will remove the event permanently. Cancelling the event will keep the event on the live site so people can see that it has been cancelled. Archiving will remove your event from the live site but keep it accessible on the backend. If you think you might like to reference an event later on, we recommend archiving instead of deleting.
- If you cancel an event by accident, you can revert this by following the same instructions and selecting “not cancelled” from the dropdown.
Privacy & sharing events
By default, events you post to your unit calendar will be publicly listed in the main UVic calendar.
- if you don’t want your event to appear publicly on the UVic Events website, you can change the privacy options:
- set your event to be seen only by admins of your group, people logged in with their Netlink ID or anyone with the event link.
Share an event with another unit calendar
Many units on campus have their calendar listings embedded on their websites. If you think your event would be of interest to another unit's audiences, you can "suggest" the event to them in LiveWhale. If they "accept", your event will be listed within that unit's event listings, too.
- under Sharing and Privacy, type in the name of the group you want to share the event with or click on “Show all” to select from a full list of available groups
- the admin(s) of each group you select will receive an invite to post your event to their calendar
- for example, if you were creating an event for the Faculty of Humanities calendar, you may want to share it with some or all of the Humanities departments
Add another group’s event to your calendar
There are two ways to add events created by other units/departments to your calendar. Please use these methods rather than creating a duplicate event, as having two versions of the event can create confusion and inconsistencies.
Accepting an invitation to share an event
If someone else invites your group to share an event, you will likely get an email notification with a link that takes you to the page on LiveWhale where you can accept the invitation and add the event to your group’s calendar. Otherwise, you can see your event invitations under the “Your Events” tab. To share an event, simply click “Accept as live.”

Sharing an event without an invitation
If you’d like to share an event from someone else’s calendar that you have not been directly invited to share, you can follow these steps:
- From LiveWhale, click on the “Toolbox” option in the upper right corner
- In the search bar that appears in the dropdown, type in a keyword for the event you want to share
- Check the box(es) of the event(s) in the search results you want to share
- Press “Link to checked events”
- The event will now be live on your calendar. Please note that this process will give you the ability to edit the event yourself—please be careful not to make any changes to an event created by another group.
Images
Featured images
The featured image will appear as a square thumbnail at the top of the page and as the main image within the events feed. Your featured image will need to be cropped to 600x600 pixels to display properly.- Ideally, you should resize your image before uploading using Photoshop or Pixlr.
- If your image isn't square when you upload it, you can crop it in LiveWhale when adding it to an event. Click the crop symbol in the bottom right corner of the image preview (top left of image window) and you'll be able to crop to a square.

Hero images
In addition to a feature image, you also have the option to add a hero image to your event. A hero image will appear at the top of the event description (see screenshot below) as a banner. Hero images should be no wider than 600 px.
To include a hero image on your event page:
- Upload it using the Add/change image function while creating or editing your event.
- Make sure the photo you want is on the top of the image list (under "Images for this event"). If it's not, you can click and drag your images into the correct order.
- Check the box at the bottom right of the images window labelled "Use first image as hero."
- Note: if you have only uploaded one image when you check this box, your event will show up with a hero image, but no thumbnail. To avoid this, make sure you've uploaded one square image for the thumbnail and one rectangular image for the hero.


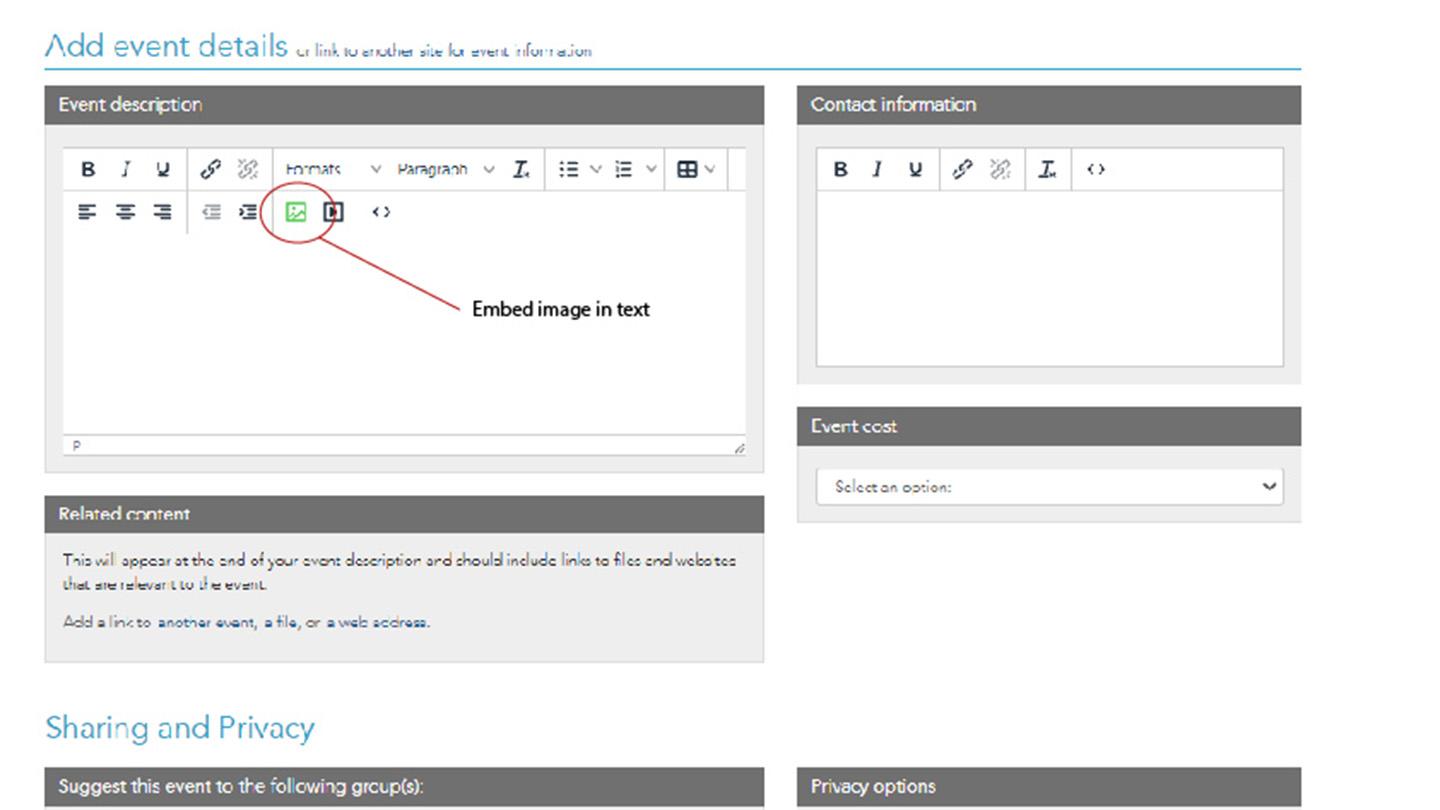
Embedding images into the event description
You can embed images into your event description by clicking the green image icon in the editor. Images embedded into the description can be square or rectangular, but the width should be no more than 600 px.
Images library
The images library (accessible through your Toolbox or on the top navigation menu) contains all the images you’ve posted to your events.
Your images are organized by default into “collections.” Any images you’ve uploaded directly into events go into the “All Images” collection, but you can create new collections to organize them after the fact. And when uploading images, you can organize them into collections as well.
Collections can be useful for staring images you know you will want to reuse in the future (e.g. graphics for an annual event).
Add a new collection
- Navigate to the "Images" tab on the top menu of LiveWhale
- Click on the "Add a new image collection" button in the top right
- Name your collection in the text box the pops up at the top of the list of collections and press "Save collection."
- If desired, you can upload images to this collection using the "Bulk add images" or "Add a new image" option.
Add existing images to a collection
- From the "Images" tab, click on "All images."
- Check the boxes in the top left corner of each image you want to add to a collection.
- Click on the "With checked items" dropdown and select "Add to collection..."
- Choose the appropriate collection from the dropdown that appears.
- Press "Go."
Tag images
Adding tags is a useful way to make images in a certain category easy to find. For example, you might tag images by topic area (e.g. "climate" or "campus life") or by event (e.g. "orientation" or "lectures").
- From the "Images" tab, click on "All images" (or, if you know that the images you want to tag are in a collection, select that collection).
- Check the boxes in the top left corner of each image you want to tag.
- Click on the "With checked items" dropdown and select "Apply tag."
- Select a tag from the dropdown that appears or select "New tag" to create one that doesn't yet exist.
- If you selected "New tag," type the tag into the text box that appears.
- Press "Go."
- You can now filter images by tag from any collection or from the "All Images" page using the filtering options on the right side of the screen.

Files
Just about any file you can download can be attached to an event; PDFs and Word documents are the most common, but other file types work as well. As with any web page, you should do your best to minimize the use of documents. If you need to attach documents, please follow UVic’s guide to document accessibility to ensure your documents are as accessible as possible for those who rely on assistive technology.
Again, you’ll likely add files directly to events, but you can also add them one-by-one or in bulk by navigating to the “Files” tab in the top navigation menu.
Subscribing to a calendar
LiveWhale has a feature that allows people to subscribe to specific calendars, meaning you can add all the events in a calendar to your Outlook calendar.
To subscribe to a calendar group:
- Go to events.uvic.ca. If you know the calendar URL (e.g. events.uvic.ca/admins), you can go there directly and skip step 2-3.
- Click on “View all calendars" on the right-side menu.
- Find and click on the calendar title you’re looking for.
- Press “Subscribe.”
- Click on “Subscribe to [CALENDAR NAME] events.”
- An attachment should download for you to open in Outlook or another calendar application with all the events listed under that calendar.
