About this guide
These instructions are supplied for the marking of forms (commonly known as bubble sheets) for a multiple-choice exam using the Remark Office OMR software. In this guide you will be taken through how to set-up a standard configuration for marking and analysis in three main sections: Scanning forms to a digital format; creating a template for your form; and importing and analysis of the scanned forms.
The Remark Office software has various tools and options built in that are not described in this guide, if you would like more detailed task specific instructions or support please refer to the Remark Software website.
Getting started
Before you start you will need:
- Windows computer with Remark Office OMR installed – Remark Office OMR is not compatible with MacOS.
Note: If you do not have access to a Windows computer sign up for the Generic Remote Desktop Service.
- Supply of new forms for your exam which can be obtained though your department or through UVic Printing and Duplicating Services.
- Answer key form.
Have your students complete their exam responses by filling out the forms and organize your forms into three groups:
One blank form
Completed answer form
Completed student forms
Scanning forms to digital format
With the completed forms, you must first scan them as you will need them in a digital format for the software to scan the forms. On your departmental MFD or printer, you should be able to scan documents to email.
For best results, set the following scan settings on your departmental MFD or printer. The exact scan settings may vary depending on the MFD or printer model.
On a standard MFD printer the recommended settings are:
- Select Send; enter your email address or choose your e-mail address from address book.
- Press Original/Sending Data Format > File Format > change format to .TIFF. Tip: If you have the choice of TIF or PDF images, choose TIF. PDF files are not native image files and require more processing by Remark Office OMR. The result is that the scanning process is slower. TIF images are the more compressed for smaller file sizes and faster processing.
- Press Color/Image Quality > Color Selection > Black & White.
- Still under the Color/Image Quality, select Original Image > For OCR.
Once the MFD or printer settings have been configured, send the scanned documents in 3 scan batches:
- Blank form
- The completed answer key form
- The completed student forms
Remark recommends for best results to have all scanned documents for a set be scanned with the same scanner settings at the same time. Ensure that you use consistent settings for all the scanned document batches.
Once you have all the files emailed to you. Download the files from your email and save them in a secure location such as your UVic OneDrive, Home Drive, or Departmental Shared Drive.
Creating a template for your form
The Remark Office OMR Template Editor is used to create form templates for the forms you process in Remark Office OMR. You must create one form template file for each form that you process with the Remark software. The form template file is the key to accurate recognition and defines all the information needed for the software to process your forms. The following steps are generated as an example for setting up a 60-question form template using the UVIC A bubble sheet form (BLUE form – No bubbled-in names, up to 5 response alternatives per question, up to 200 questions).
If you are using the UVIC B (GREEN form – No bubbled-in names, up to 10 response alternatives per question, up to 100 questions), UVIC C (WHITE form– Bubbled-in names, up to 5 response alternatives per question, up to 120 questions.) or another form format you will need to adjust the selections and formulas as necessary to accommodate the different format.
Step-by-Step Instructions
Step 1: Launch the Remark Office OMR Template Editor software
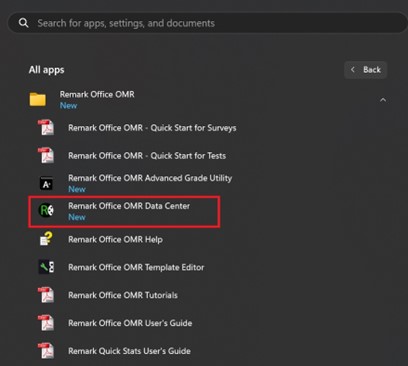
Please note that when you install Remark Office OMR it installs several programs and PDF guides. To open the Remark Office OMR Template Editor: Open your start menu > select “All Apps” > Scroll and locate “Remark Office OMR” folder. When you expand the folder, you will see all the software that is available. Select on the Remark Office OMR Template Editor:

Step 2: Create a new template
To create a new Template in the top left corner, select: File > New Form Template. You will be prompted to add a description, set page size, and page orientation:
- Description: UVIC A bubble sheet form (BLUE form – No bubbled-in names, up to 5 response alternatives per question, up to 200 questions)
- Page size: US Letter
- Page orientation: Portrait
- Once ready select “Capture Image…”:

Step 3: Import the template scan
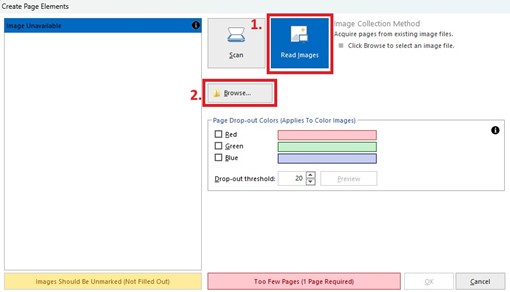
A new window will appear, and here you will be prompted to import the Template scan into the software
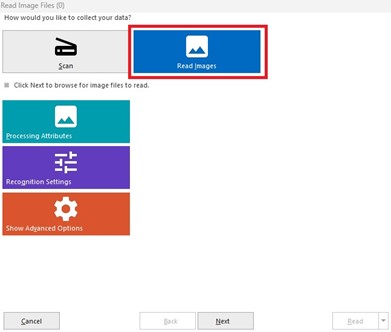
1. Highlight on “Read Images”
2. Select “Browse”. On the window that opens navigate to the location where you stored the Template scanned document:
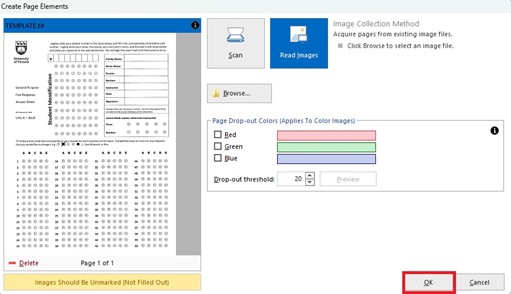
3. Once you have selected your template image you should get a preview of the scanned document. Select on “OK” to move to the next section to set up the page elements and regions:
Step 4: Start configuration of OMR
Regions are used to indicate the software where and how to process the recognized and collected information from the scanned documents. A single OMR region can contain one or more questions. To start the configuration of any OMR select OMR in the top navigation bar:

Step 5: Template creation example
In this template creation example, we will set up four different OMR regions: Student V-number and Form Questions. Described below:
1. Student V-number OMR Region
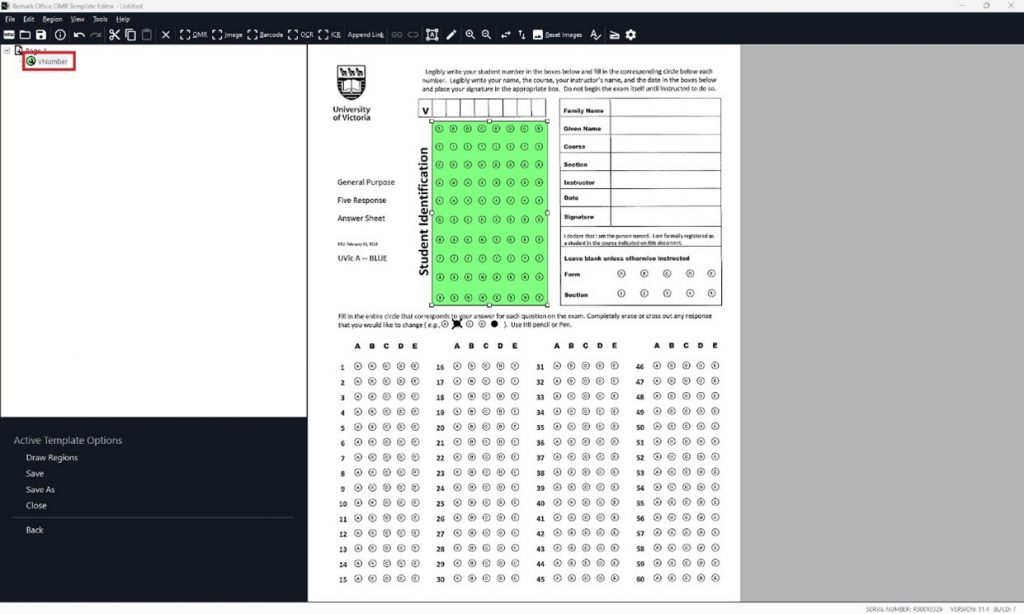
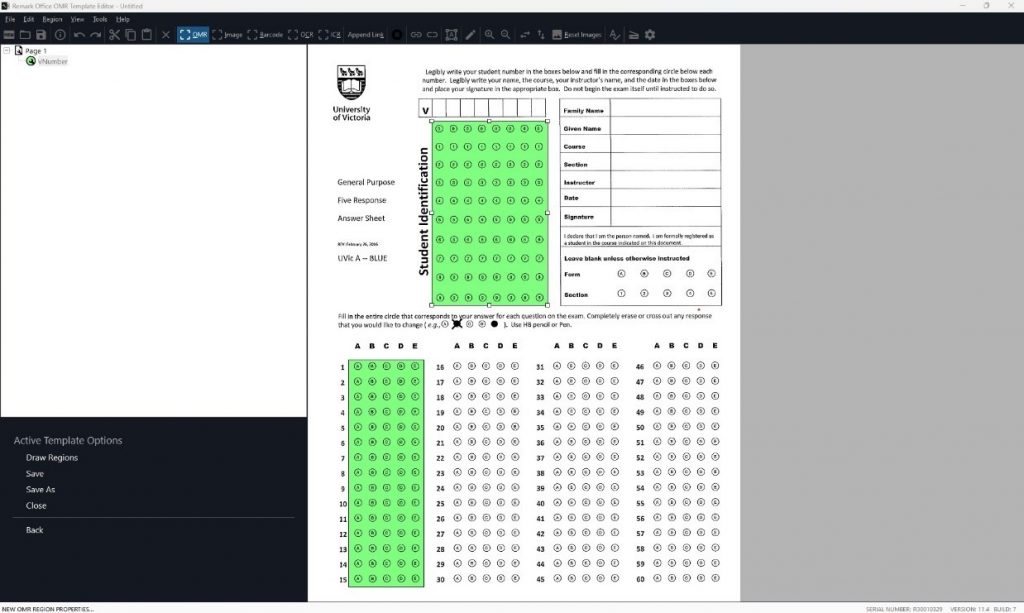
- Start the set-up of a new OMR Region. By selecting OMR in the top navigation bar. Once selected drag your cursor over the V-number field so that it is highlight in bright green. Ensure that all numerical bubbles are highlighted like shown below:
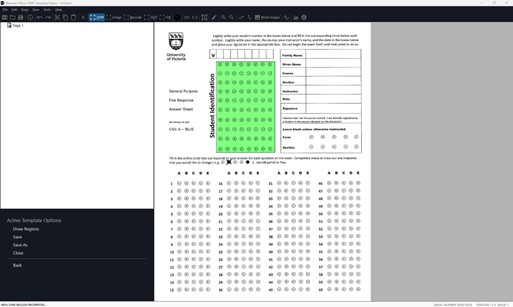
Once you release your mouse a new window will appear. If you make an error in your selected region, select “Cancel” in the window that appears to start over.
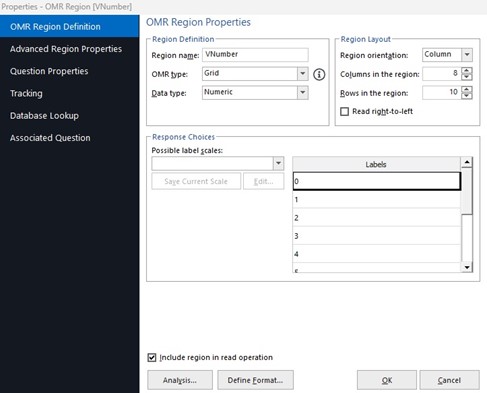
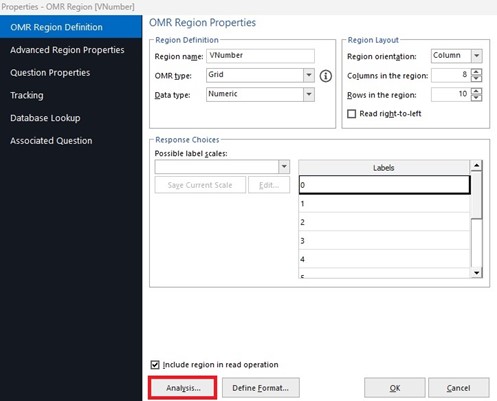
- In the window that appears you will want to input the following information:
- Region Definition:
- Region Name: VNumber
- OMR Type: Grid
- Data Type: Numeric
- Region Layout:
- Region Orientation: Column
- Columns in region: 8
- Row in region: 10
- Read right-to-left: Deselected
- Response Choices:
- Possible label scales: 0 to 9
- Labels: *Should auto fill with numbers 0 – 9
- Include region in read operation: Selected
- Region Definition:
The filled-out section should look like:
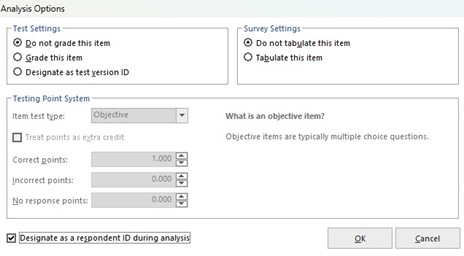
- Select on “Analysis…”:
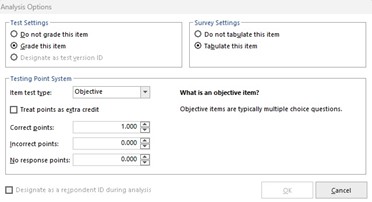
- On the window that appears, ensure that you have the following set:
- Test Settings: “Do not grade this item” is selected.
- Survey Settings: “Do not tabulate this item” is selected.
- Testing point System: Deselected
- Designate as a respondent ID during analysis: Selected
The filled-out section should look like:
- Select on “OK” To save the Analysis settings.
2. All other property tabs can be left as the default settings. They are as follows:
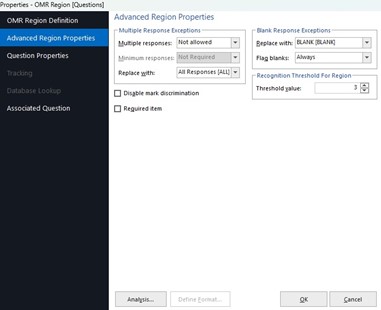
- Advanced Region Properties:

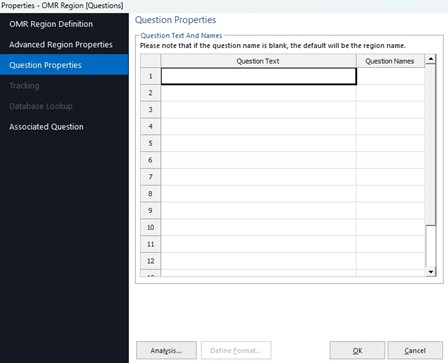
- Question Properties:

- Tracking:

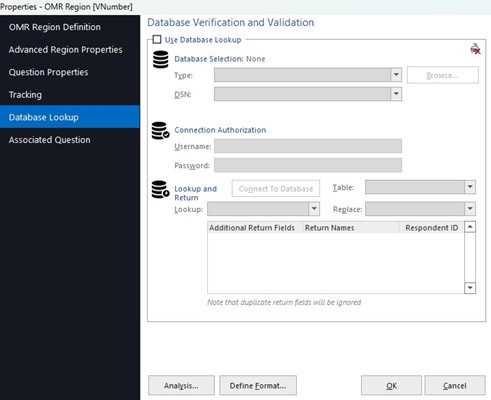
- Database lookup:
- Associated Question:

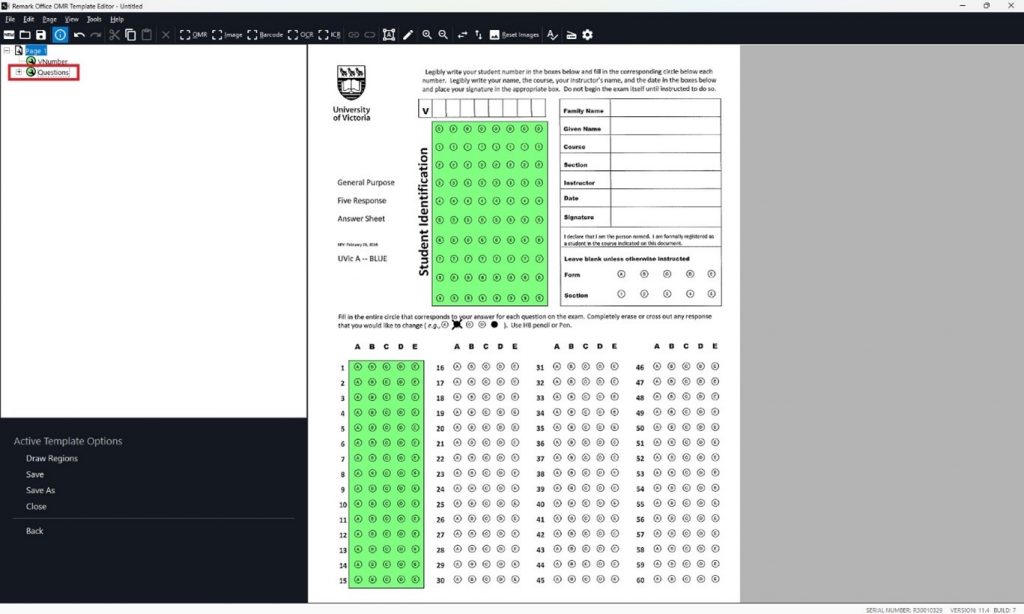
- Select OK to save all the settings for the VNumber region. Once the window closes you will be able to see the VNumber region on the left–hand pane. If you need to make changes later or confirm your settings, double-click on the name and the properties window will re-open:
The Vnumber section is now completed. The next step is to configure the Form Question Regions.
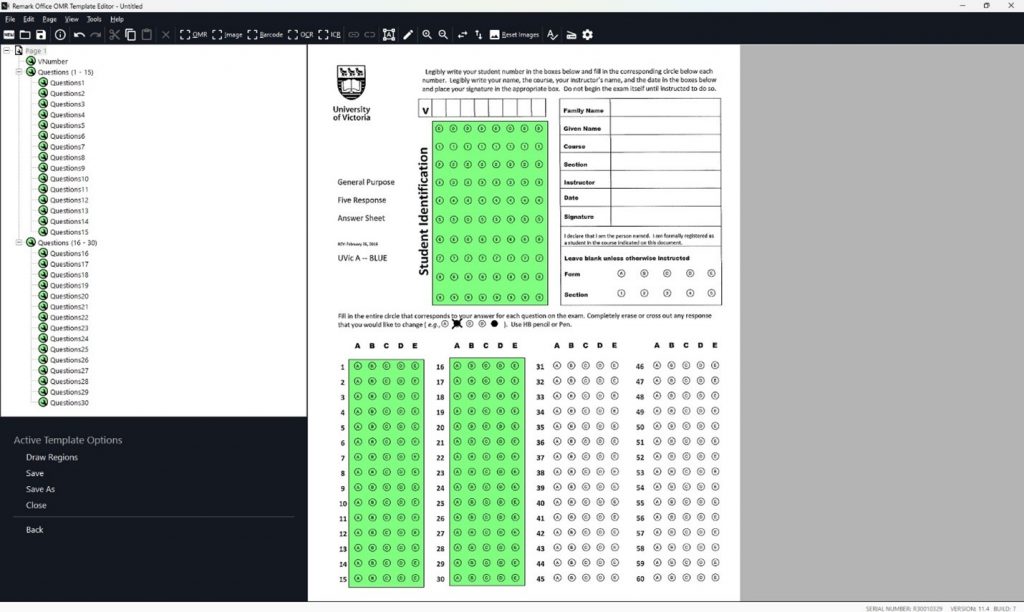
3. Form Questions OMR Region configuration. In a 60 Question form template we will need to set up 4 regions for the 4 columns of 15 questions each.
- To start the configuration of the new OMR region, select OMR in the top navigation bar. Once selected drag over the first column of 15 Questions:
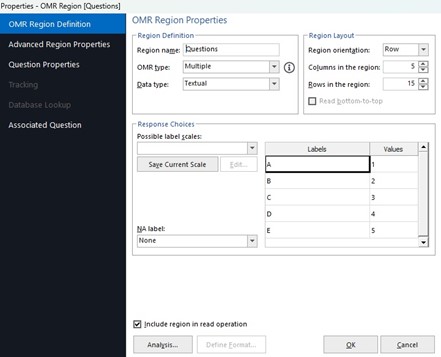
- In the window that appears you will want to input the following information:
- Region Definition:
- Region Name: Questions *The program will assign the question numbers itself
- OMR Type: Multiple
- Data Type: Textual
- Region Layout:
- Region Orientation: Row
- Columns in region: 5
- Row in region: 15
- Read right-to-left: Deselected
- Response Choices:
- Possible label scales: A to E
- NA Label: None
- Labels: *Should auto fill with numbers 0 – 9
- Include region in read operation: Selected
- Region Definition:
The filled-out section should look like:
- All remaining items should be left as default. To confirm the default settings:
- Select on “Analysis…”:

-
- Ensure that “Grade this item” is selected:
- Advanced Region Properties:
- Question Properties:
- Associated Question

- Select OK to save all the settings for the first Questions region.
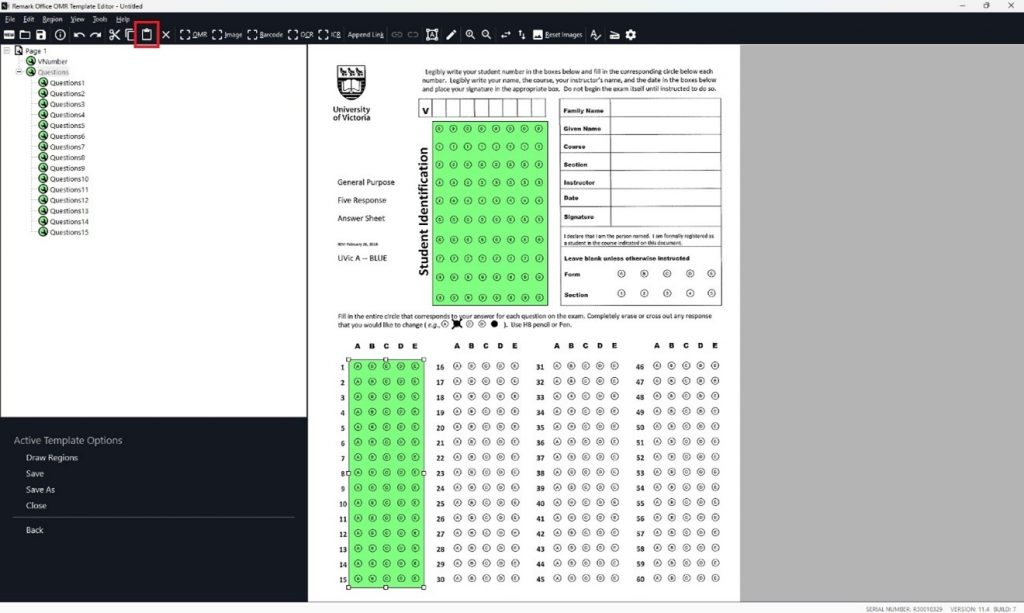
4. Once the window closes you will be able to see the Questions region on the left-hand pane.
5. If you need to make changes later or confirm your settings, double-click on the name and the properties window will re-open. If you select the “+” Icon you should see the that software has picked up and numbered the questions 1 – 15:

6. To include the remaining questions, right click on the Questions region and select “Copy”:

7. To include the remaining questions, right click on the Questions region and select “Copy”:
8. You will see the copied region below. If it is overlapping an existing region it will be red in color:
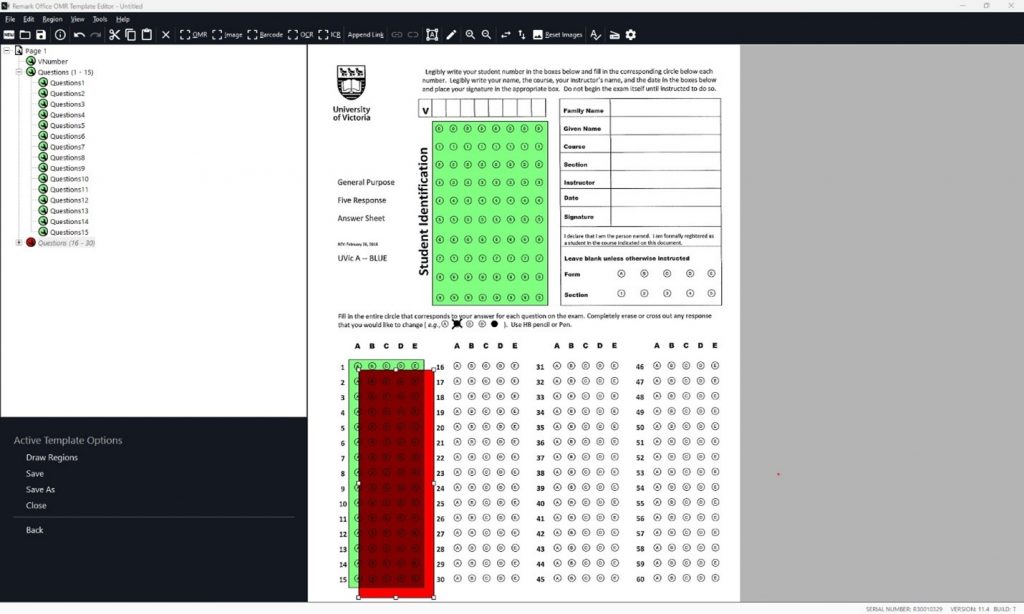
9. Select on the copied region and drag it over the next question region. You should see the software automatically pick up the question numbers 16 – 30:
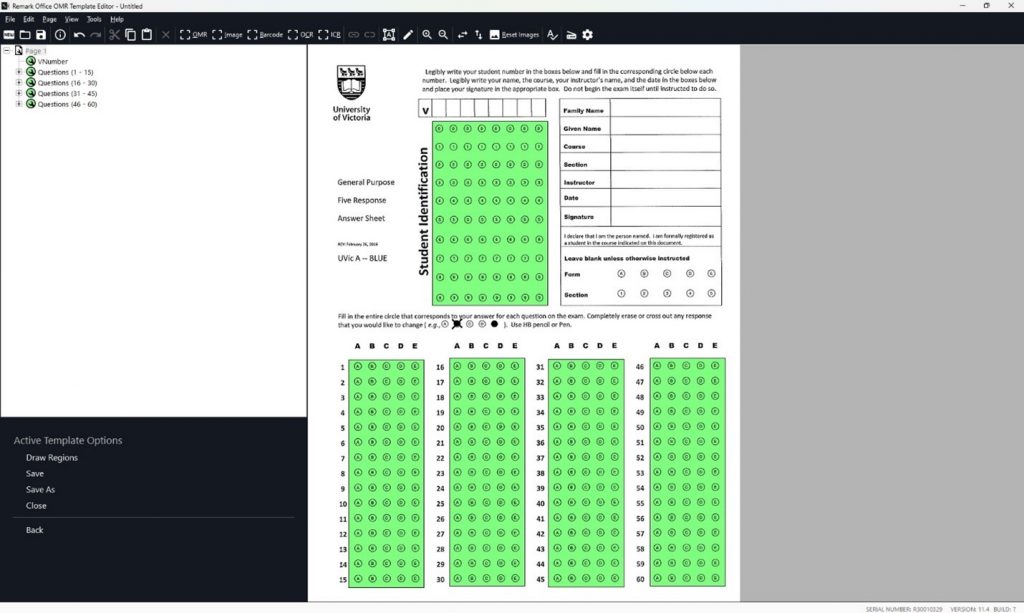
10. Repeat steps 6 – 9 for the remaining question regions. Once completed you should see all regions selected. Any region configured will be scanned and used in the analysis:
Step 6: Save the created Template
Now that the Template regions are configured you will need to Save the created Template. In the top left corner select File > Save As. By Default, Remark will save the new Template in the following folder which was created upon software installation: Documents\Remark Office OMR\Templates.
Step 7: Close Remark Office OMR Template Editor
Once saved you have now completed the set-up of your Form Template. The Remak Office OMR Template Editor can now be closed, and you can move to the Analysis of the completed sheets.
Importing and Analysis
Import Data
Once you have a template created, you will need to import the scanned exams to be read.
Step 1: Launch the software 'Remark Office OMR Data Center'
Launch the software named: Remark Office OMR Data Center. Please note that when you install Remark Office OMR it installs several programs and PDF guides. To open the Remark Office OMR Data Center: Open your start menu > select “All Apps” > Scroll and locate “Remark Office OMR” folder. When you expand the folder, you will see all the software that is available. Select on the Remark Office OMR Data Center:
Step 2: Select a template to use
Once launched you will need to select a Template to be used. You should see a list of your recent Remark Templates in the left-hand pane. If you do not need your Template, you should be able to select “Open” and navigate to the location you saved your Template in the last section.
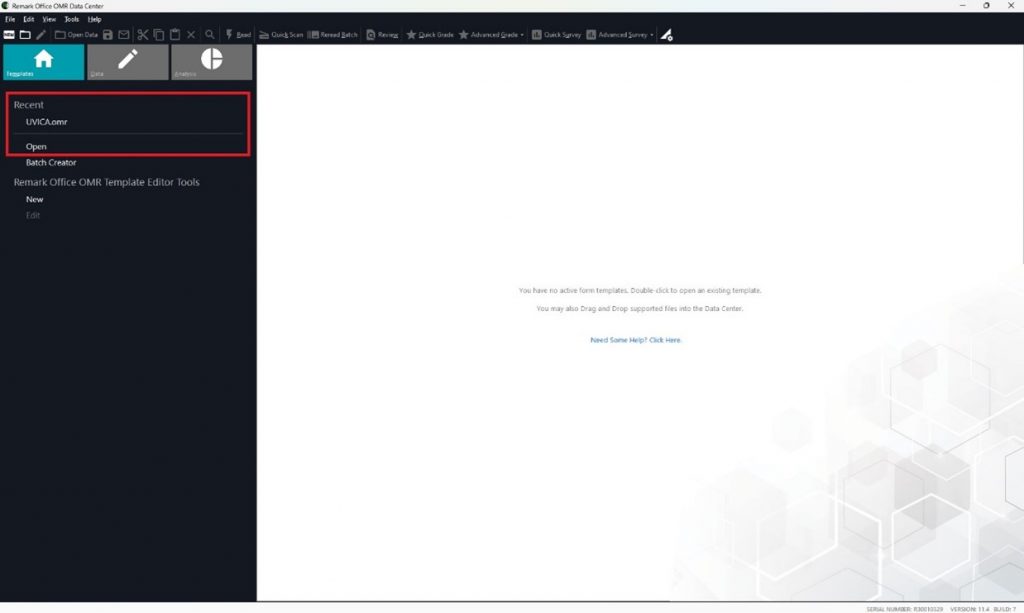
Once your Template is open you should be able to see a blank data sheet with the various columns of data set-up in the Template:

Step 3: Set-up the grade scale to match UVic’s Grade scale
You will need to set-up the grade scale to match UVic’s Grade scale. Select on “Analysis”
- Select on “Analysis preferences” on the left hand side
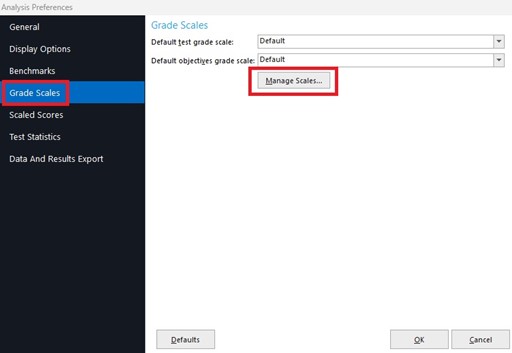
- On the window that appears select on “Grade Scales”. If you have already set-up a UVic Grade scale in the past, use the drop-down menu to set the grade scale for this analysis. If you have not configured a UVic grade scale yet please follow these steps:
Select on “Manage Scales…”:
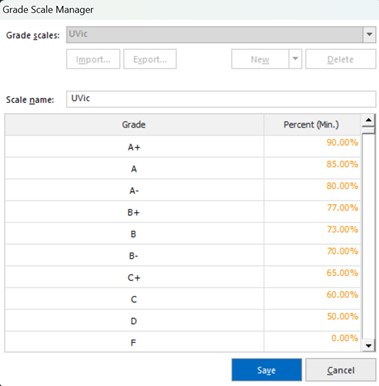
On the window that appears select on “New”:

Fill out the UVic Grade scale matching the Office of the Registrar’s standards. Once completed it should you be able to hit save. This will save it as the Grade Scale. It should look something like:
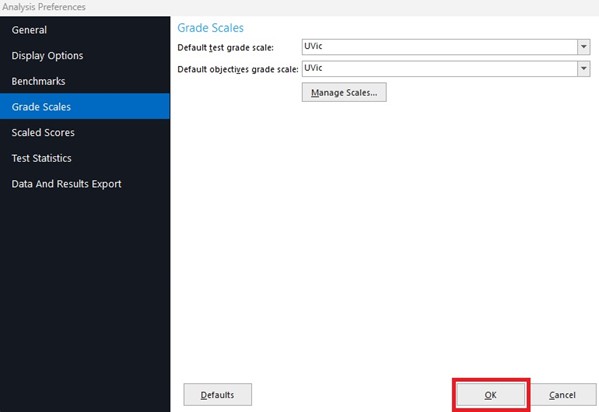
Once competed you should be able to now set the UVic as the Default Test Grade scale and Default objectives grade scale, Select “OK” To save your settings:
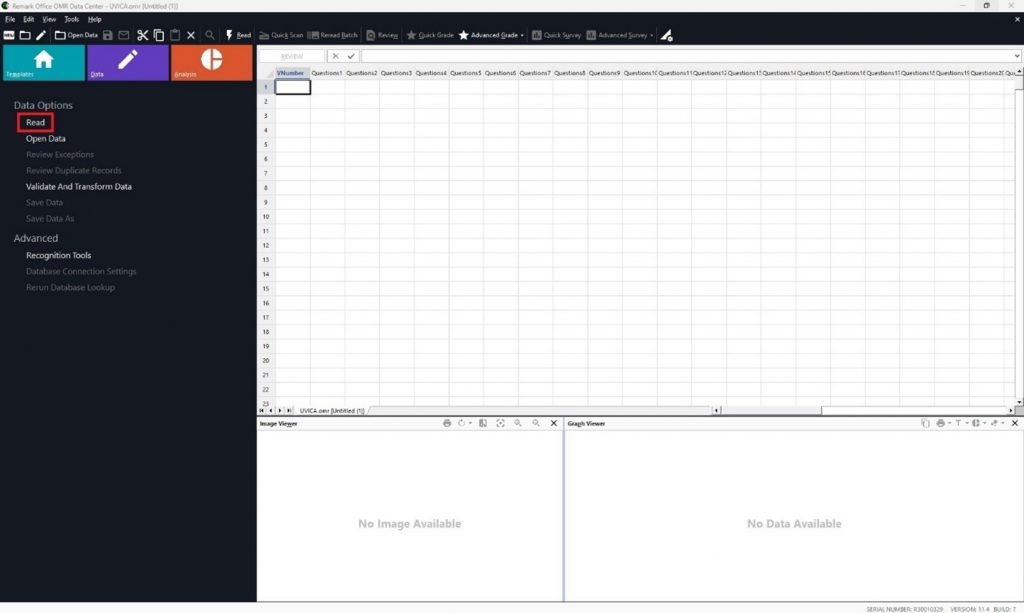
Step 4: Set-up the software to Read the Answer Key form
We will now need to set-up the software to Read the Answer Key form. In the left-hand side under Data Options select on the “Read” option:
Step 5: Import the scanned documents into the software
A new window will appear, and here you will be prompted to import the scanned documents into the software.
1. Highlight on “Read Images”:
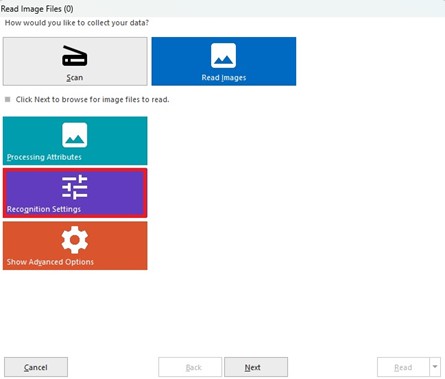
2. The three following areas allow for advanced detection and read of the images. To allow for the program to ignores crossed out (X’s) out responses. You will need to format the Recognition Settings to enable Ignore Large Marks. Select on Recognition Settings:
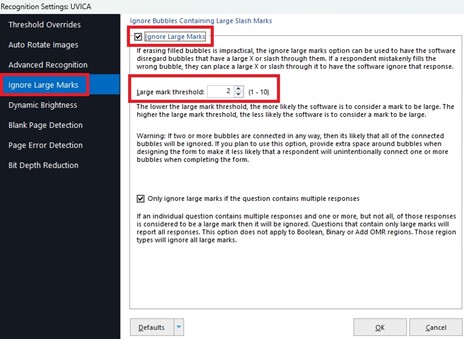
3. On the window that opens, select on the “Ignore Large Marks” tab. Enable “Ignore Large Marks”. Default setting is 2. This can be modified to setting of 1 to increase recognition of both a large X or \ which will be ignored when more than one item is marked in a question on the response sheet. Duplicates will still be picked up if a student marks in more than one choice and does not cross out one, or uses a small or faint cross to indicate a choice they did not intend:
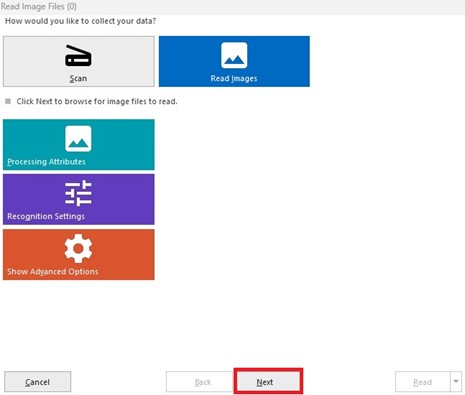
4. Select OK to save the settings. All remaining settings at their defaults. Select on Next:
5. Navigate to the location where you stored the scanned .tif documents from the first section and select the answer key and scanned form batches form. Select on the files and use the “Add Selected” button to add the files:

6. Once Added ensure that files are in the correct order. Files will be read top down. First Add the Answer Key and then the completed student forms. Once ready select on “Read”:

Step 6: View and fix any errors
The data from the scanned documents should then all be read and showing. Once read you will want to select on “Review Exceptions” to view and fix any errors the software had in reading the documents:

Step 7: Run the analysis
Once any errors are corrected you are now ready to run the Analysis.
Analysis
Once the forms are imported you will be ready to have them analyzed.
Step 1: Select Analysis
Within Remark Office OMR Data you will be able select Analysis:
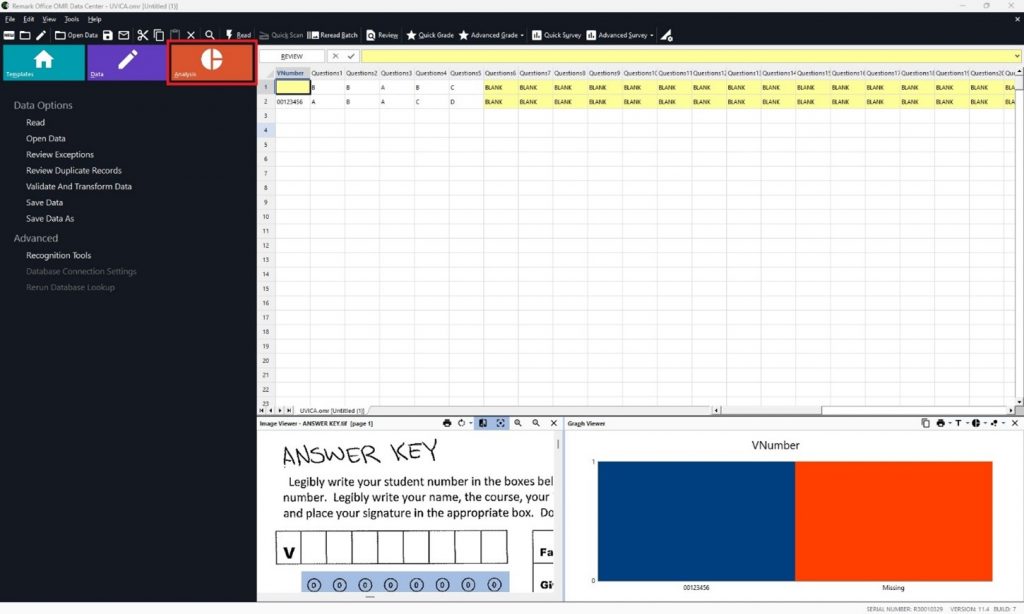
Step 2: Select Quick Grade
Once open you will have many options on how you would like the forms to be analyzed. Selection on Quick Grade as we have imported the first scanned images as the answer key:

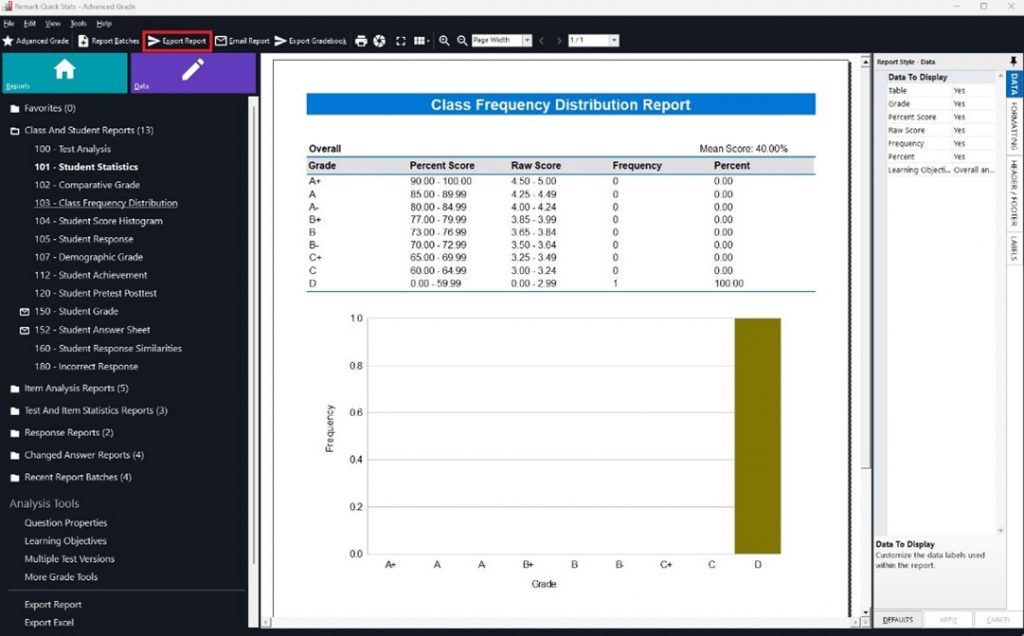
Once Quick Grade is selected the software auto start the analysis. Once completed you will be shown the report “101 – Student Statistics” summary page with the student number, their grade, and totals:

Step 3: Generate and Export report
By Default, to provide the instructor with the Exam Analysis we will need to generate and export a report. we will want to export the following reports in a package: 103, 310, 105, 206, 204, and 320. To do this as one package:
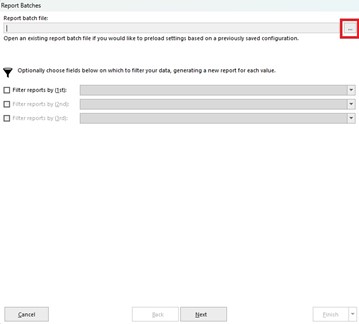
1. Select on “Report Batches” in the left column:

2. If you have created and saved a report batch settings file, select on the “…” next to the Report Back file: option. Locate the file and import it and select finish. You can now skip to step 8. If you have not completed this before select leave all fields blank and select next:
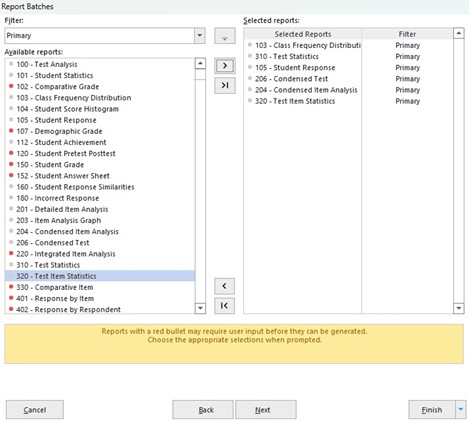
3. Select the desired reports. The default is: 103, 310, 105, 206, 204 once you have them selected it should look like:
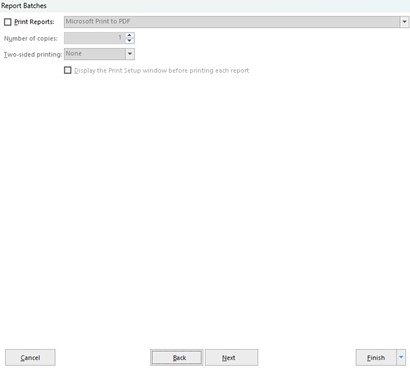
4. Select Next. Ensure “Print Reports is de-selected” and select “Next”:
5. Ensure “Display the reports upon completion”. The rest remain de-selected. Select Next.

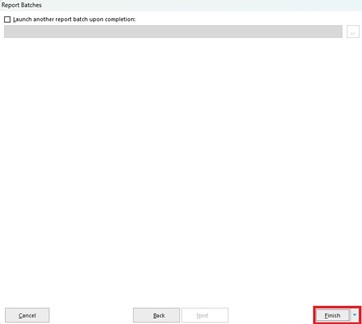
6. Ensure that “Launch another report batch upon completion” is de-selected. Select on Finish:
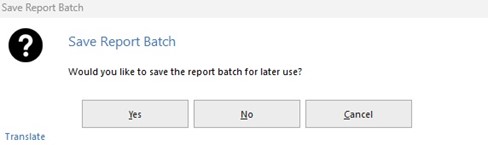
7. You will be prompted to save your Report Batch. Select Yes to stave this custom batch set-up for next time.
8. The software will now process and generate the reports. This can take some time. Once completed you should get a preview of the report. To Export the report as a single PDF select on “Export Report”:
9. Save the report to a known location so that it can be emailed to the instructor.
Step 4: Export your results to a .csv
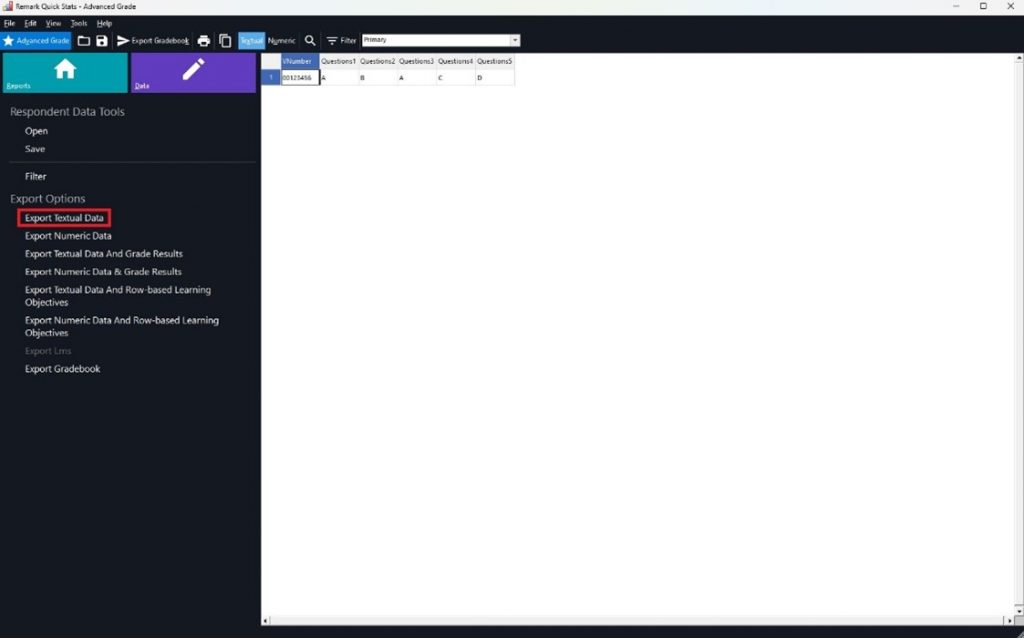
To Export your results to a .csv so the instructor can manipulate and analyze the results. Select on the Data Tab:
The Export you select will depend on what the instructor has asked for in the Exam cover sheet. For the default options:
- Exam Scores + Textual Data:
- Select on the “Export Textual Data”:
-
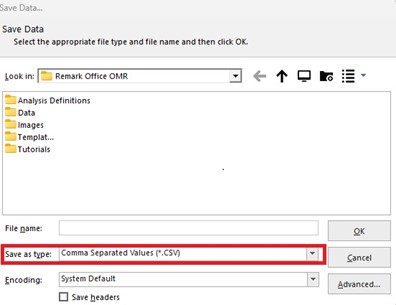
- In the window that appears, Save as Spreadsheet .csv give it a suitable file name and save the file to an appropriate location:

- Exam Scores + Numeric Data:
- Select on the “Export Numeric Data”:

-
- In the window that appears, Save as Spreadsheet .csv give it a suitable file name and save the file to an appropriate location:
- Raw Data:
- Select on “Export Gradebook”:
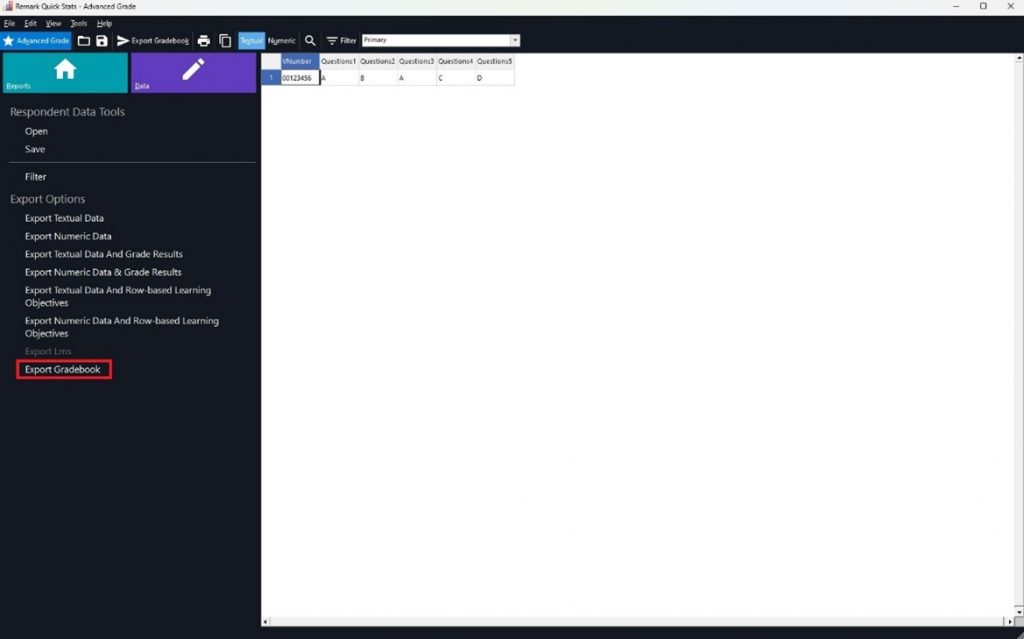
-
- In the window that appears, Save as Spreadsheet .csv give it a suitable file name and save the file to an appropriate location:

*Repeat these steps and export “Export data & grade results” or any of the formats that are desired for marking and providing students their grades.
Step 5: Manipulate data for marking
Open the file in Excel and view and manipulate data as needed for marking.
Uploading grades into Brightspace’s gradebook
Once results have been produced by Remark, instructors may choose to upload these results to their Brightspace gradebook to aid in final grade calculation, as well as to provide grades to their students. To do so, instructors must use the Import function built into Brightspace’s Grades tool to bring in the results in CSV format. Please see above step in analysis: Export your results to a .csv for instructions on preparing this file in Remark Office OMR 10.
Create a reference file for import
- From your course homepage, click on Grades from the blue navigation bar.
- Click on the blue Import button at the top left of the page.
- Click on Grades_Sample_Import_File.csv to download a sample import document.
The sample CSV file downloaded in steps 1-3 will provide a template for altering the data produced by Remark in the exported CSV.
Prepare your exported CSV file from Remark for upload into Brightspace’s gradebook
- Open both files using Microsoft Excel.
- In the CSV produced by Remark, alter the column headers. For the column containing student V numbers, retitle the heading “OrgDefinedId.” For the column containing the student grades, retitle the heading to match your grade item in Brightspace, and suffix it with “Points Grade.” For example, “Test 1 Points Grade.”
- Ensure you insert a column with the header “End-of-Line Indicator” at the far right of your columns of data to match the sample import file, and ensure that each row contains a # character.
- Ensure that you save the resulting file in CSV format.
Upload into Brightspace
- Open your Brightspace homepage, and click on Grades from the blue navigation bar.
- Click on the blue Import button at the top left of the page.
- Click on Choose File, and locate the prepared CSV file in your file directory.
- If you have not created a grade item for your Remark results, click the checkbox next to “Create new grade item when an unrecognized item is referenced” to create one during the import process.
- Click Continue. Brightspace will analyze the file to ensure that it aligns with necessary formatting. Any errors will be marked on this page. If there are no errors in the file, click Continue.
- Preview your import to ensure that grades are being sent to the correct grade item.
- If you are satisfied with the results of the import preview, click the blue Import button at the bottom left of the page to upload these results to your Brightspace gradebook.
This process will bring grades produced in Remark into the Brightspace gradebook. If you encounter any issue with this process, please reach out to ltsisupport@uvic.ca for assistance.
Advanced analysis
The following instructions are supplied to configure more advanced analysis and for processing exam bubble sheets. This is for handling cases where you have an exam with a dropped question, bonus questions, weighted questions and exams with multiple answer keys. Please note: The Remark Office software has various additional tools and options built in. If you would like more detailed task specific instructions or support please refer to the Remark Software website.
Before you start you will need to have your Template, Answer Key, and Student Forms ready for analysis.
Dropping a question, setting up bonus questions, changing a question weight
- Scan answer keys as separate image files
- Scan all student exams
- Open Remark Office OMR Data Centre
- Open the template you created for the exam
- Select Tools > Read and read in the answer keys first
- Read in the scanned student exams
- Select Advanced Grade Wizard
- Select Answer Key
- Choose the Answer key source
- Use GRID ROW if the key is already scanned and is the first record in the scan
- Select GET KEY
- All the responses should be read in
- Choose Questions Properties
Drop a question
- In the left-hand side select the QUESTION(S) to be dropped.
- On the right-hand side, remove the check box from ‘Grade this question’ and the software will not include that question in the marking process.
Bonus question
- In the left-hand side select the QUESTION(S) to be designated as a bonus
- On the right-hand side select the ‘EXTRA CREDIT’ box
Extra weight for a question
- In the left had side, select the QUESTION(S) to change the weight value.
- On the right-hand side select the OBJECTIVE QUESTION
- Increase the value of the Correct points (default is 1.000)
Creating an answer key for multiple versions of an exam
- Scan answer keys as separate image files
- Scan all student exams
- Open Remark Office OMR Data Centre
- Open the template you created for the exam
- Select Read Wizard and read in the answer keys first
- Read in the scanned student exams and make any necessary corrections for read errors
- Select the TOOLS menu, then click Analysis and then Advanced Grade
- Select the Test Versions option
- Select the Define multiple test versions checkbox
- Options available:
- The standard option allows you to import the answer keys and does not require the questions on the exams to be the same questions
- The advanced option allows you to import one answer key and then MAP the corresponding questions in additional keys to the original. The questions in all exams must be the same for this option.
Standard option steps
- Select the Standard button.
- Use the drop-down list for Which question’s answer identifies the test versions to select a question from the test that contains the value identifying the answer key. Your form must have some sort of identifier on it so that the software knows which answer key to use for each student’s test.
- Click the Create Version button to enter an answer key.
- If you entered an answer key previously in Advanced Grade, the correct answers are listed. Skip to Step 6. If you did not yet enter an answer key use the drop-down list in the Import answer key from box to choose the type of answer key you are using (data grid row or read a form from the scanner or image file). Then click the Import Key button to enter or import the answer key information into the answer key grid (if using a grid row, specify the row in the Grid row box). Alternatively, manually enter the key information in the grid.
- Enter a value in the Version ID box to identify this version. You will find the Version ID at the top of the grid in purple.
- Repeat steps 4-6 to create additional test versions.
- Once you have your test versions set up, continue making selections in Advanced Grade or click the Grade button to grade your test. The tests are graded by matching the students’ test version to the answer keys you have set up.
Advanced option steps
- Select the Advanced button. The original answer key question order is visible in the Version (original) column.
- Use the drop-down list for Which question’s answer identifies the test versions to select a question from the test that contains the value identifying the first answer key. You form must have some sort of identifier on it so that the software knows which answer key to use for each student’s test.
- Enter a value in the Version ID box to identify this version. You will find the Version ID at the top of the grid in purple.
- To add more answer keys, click the Create Version button.
- A duplicate of the original key appears in the Key 2 column. Select a value in the Version ID box to identify this version.
- Rearrange the questions in the Version 2 column so that they relate back to the original answer key (Version 1) by moving them with the up and down arrows. When mapping questions, look at the question on the original answer key and then put it in its proper place on subsequent answer keys. You must have the actual test questions to do this mapping.